Storm Window Installation for Older Homes: A Technical Guide
A Comprehensive Guide to Storm Window Installation for Older Homes
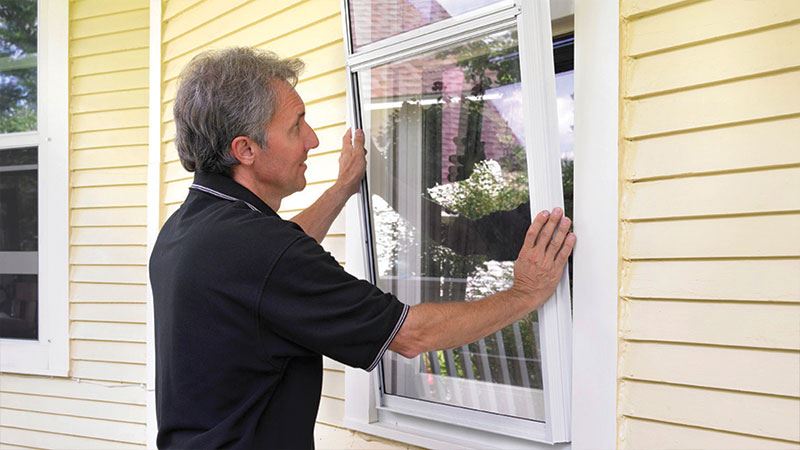
Storm windows are secondary window units installed either on the exterior or interior of existing primary windows. In the context of older homes—typically those built before the widespread use of double-pane insulated glass—these units serve as a vital defensive layer. They are designed to improve thermal efficiency, reduce air infiltration, and protect historic primary windows from environmental degradation. For many homeowners, this approach is a preferred alternative to total window replacement, as it preserves the architectural integrity of the original structure while addressing modern energy standards.
This guide provides an objective, educational analysis of the technical and logistical requirements for storm window installation for older homes. Readers will learn about the various material categories, the physics of dead-air space insulation, and the practical steps required to ensure a watertight and airtight fit. By under

Overview of Storm Window Installation for Older Homes
The core concept of storm window installation is the creation of a “dead-air” space between the primary glass and the storm sash. This gap acts as an insulating buffer, reducing the rate of heat transfer (U-factor) and blocking drafts. In older homes, original single-pane wood windows often possess significant aesthetic and material value but lack the thermal resistance of modern units. Storm window installation for older homes addresses this performance gap without requiring the removal of original historic fabric.
Homeowners typically approach this project with the goal of increasing interior comfort and decreasing noise pollution. Common expectations include a reduction in heating and cooling loads by as much as 10% to 30%. The outcome of a successful installation is a stabilized indoor microclimate and the prevention of condensation on the interior of the original window. Furthermore, exterior storm windows protect original wood sashes from rain, snow, and UV radiation, which are the primary drivers of rot and paint failure.
Key Categories and Material Variations
Storm windows are categorized by their mounting location (interior vs. exterior) and their operational design (fixed vs. operable).
| Category / Type | Description | Common Use Case | Time / Cost / Effort Level |
| Two-Track Exterior | Two glass panes; the bottom pane slides up for ventilation. | Standard residential historic homes. | Moderate / Mid-Range |
| Triple-Track Exterior | Includes two glass panes and a dedicated screen track. | Homes in climates requiring seasonal airflow. | Moderate / Mid-Range |
| Interior Magnetic | Acrylic or glass panels that snap into a magnetic frame. | High-rise apartments or restricted historic districts. | Low / Mid-Range |
| Traditional Wood | Custom-built wood frames with seasonal glass/screen inserts. | High-fidelity historic restorations. | High / Premium |
| Low-E Storms | Metal or vinyl frames with Low-Emissivity glass coatings. | Maximum energy efficiency in extreme climates. | Moderate / Premium |
Choosing between these categories depends largely on local preservation ordinances and the desired level of convenience. For example, magnetic interior units are nearly invisible from the street, making them ideal for strict historic districts, while triple-track exterior units offer the most practical day-to-day functionality for ventilation.
Practical Scenarios for Historic Applications
Scenario 1: The Preservation of Original Wood Sash
An 1890s Victorian home with original wavy glass and detailed muntins requires protection from coastal weather.
-
Components: Custom-sized aluminum triple-track units with a color-matched finish.
-
Process: Measuring each window opening individually (as older homes often shift), prepping the exterior casing, and ensuring the “weep holes” are clear for drainage.
-
Relevance: This scenario prioritizes the longevity of the original wood by shielding it from moisture while maintaining the window’s functionality.
Scenario 2: The Urban Noise-Reduction Strategy
A historic brick row house located on a busy metropolitan street with significant traffic noise.
-
Components: Interior laminated glass storm windows with acoustic gaskets.
-
Process: Installing a discreet track inside the window jamb and snapping in a heavy, laminated pane that creates an airtight seal.
-
Relevance: Laminated interior storms are highly effective at dampening high-frequency sounds, making them suitable for urban environments.
Scenario 3: The Low-Impact Seasonal Solution
A mid-century modern home where the owner wants to improve insulation only during the winter months.
-
Components: Compression-fit interior acrylic panels.
-
Process: Measuring the interior window stop and ordering panels that “pop” into place using a flexible bulb seal.
-
Relevance: This is a non-invasive approach that requires no permanent fasteners, ideal for those who wish to remove the units during the spring.
Comparison: Scenario 1 focuses on exterior protection; Scenario 2 focuses on interior acoustics; Scenario 3 focuses on seasonal flexibility. Homeowners should select the scenario that aligns with their primary concern—weather, noise, or ease of removal.
Planning, Budgeting, and Resource Considerations
Planning for storm window installation for older homes requires meticulous measurement. Because historic openings are rarely perfectly square, “stock” sizes are often insufficient. Each window must be measured at the top, middle, and bottom to identify any bowing or racking in the frame.
| Category | Estimated Amount (Example) | Explanation | Optimization Tips |
| Units (Aluminum) | $150 – $350 per window | The cost of the frame and glass. | Order in bulk to reduce shipping fees. |
| Custom Wood Units | $400 – $800 per window | Hand-crafted sashes to match historic profiles. | Paint sashes before installation to save time. |
| Installation Labor | $50 – $150 per window | Professional fitting and caulking. | Group installs by floor to improve crew efficiency. |
| Hardware/Sealant | $10 – $20 per window | High-grade caulk and stainless fasteners. | Use “butylene” or “high-stretch” caulk for longevity. |
Note: Figures are illustrative examples and vary based on glass type (standard vs. Low-E) and regional labor rates.
Strategies, Tools, and Support Options
Efficient installation relies on a set of standardized strategies to ensure the unit performs as a thermal barrier.
-
The “Caulk-Three-Sides” Rule: For exterior storms, apply caulk only to the top and two sides.
-
Pros: Prevents water from entering the top; allows moisture to escape through the uncaulked bottom.
-
Cons: If the bottom is accidentally sealed, trapped moisture will rot the original wood sill.
-
-
Low-E Coating Evaluation: Selecting glass with a microscopic metallic coating.
-
Pros: Reflects radiant heat back into the room; significantly increases R-value.
-
Cons: Can have a slight “tint” or “shimmer” that may be noticeable on historic facades.
-
-
Blind-Stop Mounting: Attaching the storm window to the narrow strip of wood (blind stop) between the casing and the sash.
-
Pros: Provides a very secure mechanical attachment and a cleaner look.
-
Cons: Requires a flat, rot-free surface for a proper seal.
-
-
Integrated Weep Holes: Utilizing small vents at the bottom of the storm frame.
-
Pros: Critical for allowing condensation to drain out of the air gap.
-
Cons: Can become clogged with insects or debris over time.
-
Safety, Risks, and Common Challenges
-
Lead-Based Paint: Many older windows are coated in lead paint. Disturbing these surfaces during installation can release toxic dust. Mitigation: Use lead-safe work practices, including HEPA vacuums and wet-sanding techniques.
-
Trapped Moisture: If a storm window is sealed too tightly without ventilation, condensation will form on the primary sash. Risk: This can lead to rapid wood rot and mold. Prevention: Ensure the storm window has functional weep holes or small “breather” vents.
-
Egress Requirements: In bedrooms, windows must be operable for emergency exit. Challenge: Installing a fixed (non-operable) storm window can violate fire codes. Action: Only install operable (sliding) storm windows in designated sleeping areas.
-
Ladder Safety: Exterior installation on multi-story homes involves working at height. Action: Use ladder stabilizers and ensure the ground surface is level and compacted.
Maintenance and Long-Term Management
Ongoing management ensures the storm windows remain clear and the original windows underneath stay dry.
-
Annual Cleaning: Remove the storm sashes (if operable) once a year to clean both the storm glass and the primary window glass.
-
Weep Hole Inspection: Use a small wire or pipe cleaner to ensure the drainage holes at the bottom of the frame are not blocked by spider webs or dirt.
-
Caulk Inspection: Check the perimeter sealant every 3–5 years. If the caulk is cracked or peeling, remove and replace it to prevent air leaks.
-
Hardware Lubrication: Apply a dry silicone spray to the tracks of sliding storm windows to ensure smooth operation and prevent the motor-latches from sticking.
Documentation and Reporting
Organizing the technical data of an installation is vital for future maintenance and for proving energy improvements to local historic boards.
-
The Window Schedule: A document listing the exact dimensions and batch numbers for every storm window installed.
-
Example 1: A homeowner saves the manufacturer’s “Low-E” certificate to qualify for a federal energy tax credit.
-
Example 2: An owner provides “before and after” photos to a Historic District Commission to demonstrate that the new storm windows do not obscure the original architectural details.
Closing Summary
Storm window installation for older homes represents a technically sound and fiscally responsible method for upgrading historic structures. By creating an insulating air gap and providing a physical barrier against the elements, these units protect original materials while offering the thermal performance of modern glazing. Success in these projects is achieved through precise measurement, adherence to “lead-safe” protocols, and the use of proper ventilation strategies to prevent moisture accumulation.